Showing posts with label kitchen skills. Show all posts

Saturday, April 17, 2010

Grilled Chicken with fresh Rosemary

It's about 4:30 in the afternoon.  I've just returned from work. I've been bidding new work and I'm behind on that.  I haven't started the quarterly tax returns, yet.  They are due by the end of the month, so I'll be working on the weekend.

I pull out the chicken breasts to find they are still a little frosty.  I put my big collandar into the sink with the chicken breasts in them and turn on the faucet so that cool water runs over them.  I start making the marinade. The marinade makes enough for 8 to 12 boneless, skinless chicken breasts.  Here is a good opportunity for planned left overs.  We'll have Chicken Caesar Salad for lunch tomorrow.

LeAnn's Marinade for Grilled Chicken
1 clove garlic
1 t. salt
1/2 t. freshly ground black pepper
2 T. lemon juice, the bottled kind for marinades is okay with me (Use fresh for salad dressings)
1/2 c olive oil
1 t. dijon mustard
1 T. fresh rosemary finely minced

I recommend marinading meat in pyrex pie plates.  I do that all the time.  Dry the chicken with paper towels and arrange them in the pie plate.  Add the marinade and leave it on the counter top.  I'd refrigerate this if I was going to leave it for long.

Husband comes through asking me if I'm going to yoga.  I say yes and I'll return in a little more than 1 hour.  I ask him if we are expecting any kids, large or small.  He says no and I'm off.

I return after a lovely hour of yoga to a busy house with kids, the small kind.  Fortunately I've got plenty of chicken.  I ask Husband to turn on the propane grille which he does.  As it heats, I start a pot of rice and another of brocolli.  Many times Hailey is interested in cooking with me, but tonight Spong Bob Square Pants has her attention. 

Husband works around me heating a bottle for the smallest one.  The chicken goes on the grille.  I've had good success with this marinade.  My recipe is printed on a dot matrix printer and I haven't had one for 15 years.  I was making it long before that.  This recipe adds a lot of flavor to plain chicken.  I think it is better than any bottled marinade on the market.  I don't buy that sort of thing any more.

Off comes the chicken and its dinner.  I add butter to to the rice, taste it and add a little more salt.  Hailey wants to taste it also, so I hand her a spoon.  I drain the brocolli, add more butter and salt.  Hailey eats a boat load of everything. 

Hint of the day:  If you need chicken to cook very fast - and you can get the thawed first, pound them with a meat mallet.  Most instructions I've seen for this say to put a layer of plastic wrap or wax paper out, put the chicken pieces on it, and put another layer of plastic wrap or wax paper on top, then pound.  That just doesn't work.  You end up pounding holes in your plastic wrap and just making a big mess.  The sacks that cereal or crackers come in are sturdier and work for this procedure.  I save them all and use them for this and other purposes.  Open up the sack until it is flat, lay the chicken on it, fold it over to cover the chicken and pound away. 

The pounding breaks up some of the stucture of the meat and makes a flatter fillet which cooks much quicker.  If you don't have a meat mallet, my mother used the bottom of a small sauce pan.  Just hold onto the handle and bang it.  Actually feels good.  I just saw a Rachael Ray where she did this same thing with a rolling pin.  Don't think I need chicken juice on my rolling pin, Rachael.  Just saying, don't run out and buy a meat mallet unless you want to.   You probably have something in your kitchen that works just fine. 

Still plenty of chicken left for Chicken Caesar Salad at lunch tomorrow.  I'll pack the ingredients in the morning and take them to work with me.  Check back for that.

Remember to be organized.

Managing a busy kitchen

My mother had a job a great deal of the time I was growing up.  This was during a time when the majority of women didn't work (the 60s).  I realize now that they were always needing more money and that was the reason.  I remember little things that let me believe that it was incredibly difficult for her.  They both believed that the house and kitchen was her domaine.  My father did not do much of traditional "woman's" work.   

Not that he was lazy. He was a very busy person and almost always had additional projects.  For example, in the fall, he purchased a wrecked vehicle and spent the winter months rebuilding it in the garage.  I can't say exactly how many winters he did this but several.  To this day, the sound of a man banging around in the garage is quite comforting.  He was always building something, almost like an inventor.  When he decided he needed an air compressor, he took the compressor out of an old refrigerator and built one.  One hobby we had was going place to collect rocks.  He built an agate polisher out of two paint cans and some sort of motor.  We'd put the rocks in the can.  He'd add something other substance, can't remember what.  He'd turn it on and it would shake back and forth all night.  I still remember listening to the rumbling sound in the garage.  Then, like magic, we opened the cans to find polished agates.  As you can tell, I have a fondness for both men and garages. 

We always had some sort of little travel trailer.  We'd go out for the weekend camping.  Mom would cook on an old Coleman lantern.  We'd have a fire.  At bed time, we'd snuggle up in our sleeping bags in the trailer.  We'd wake up completely freezing, so Dad would get up and start the little propane heater in the trailer until we were warm enough to get up.  Mom would start a pot of coffee on the stove in the trailer, an old fashioned purculator.  I didn't taste coffee until I went away to college, but I've loved it from first taste.  I think I associate the smell with the comforting feelings of my safe little world and that purculator.

So what does all of this have to do with managing a busy kitchen?  I have absolutely no idea how my mother managed to produce good food for all of us so consistently.  It is very difficult to come home after a busy day and make dinner sometimes.  I'd like to have some life outside of work and cooking dinner.  When can that happen? 

I've changed my yoga habit from day classes to evening.  This class is important to me, so I'm fairly determined to do it consistently.  I run home and start the preparation for the meal, get everything ready.  Do any sauting or early cooking, then turn it off and head for yoga.  I come back and finish the meal.  Husband has been very helpful and patient, but it isn't easy.   I still need plans for breakfast for me and lunch for the two of us.

I'm going to start chronicalling this problem.  I'm going to be more appreciative of what my mother did.    I'm going to be more appreciative of the help and support my husband gives me.

I'll start with grilled chicken and rosemary.  See the next post.

Remember to be thankful for the little things.

Saturday, April 3, 2010

Bunny Cake

When I was younger, I dated a fella, named Steve.  Unfortunately, he wasn't that nice of a guy, because his parents were awesome.  They were this big stereotypical Italian family.  And in fact, Steve was 1/2 Italian.  Both of his dad's parents were born in Italy.  They weren't still alive, but I enjoyed the stories and the warmth mixed with a little danger of the Dad.  I learned plenty from him.  But it was his mother!  Not Italian, but more of the stereotypical big warmth than any of them.  This cake is something she did around Easter.  Not the recipes, the decorations that shape it into a bunny.

Here's the old fashioned way to prepare a cake pan, (instead of spray.)  Dip your fingers into the solid shortening and get some.  Spread it with your fingers over the pan bottoms and sides until it is spread evenly and thoroughly covers.  Get addtional shortening in your hands and continue with both pans.  I recommend trying to enjoy this.  Kids love this kind of this for good reason; it's fun. 

Now spoon a little all purpose flour into each pan.  Hold the pan upright, shaking it and tapping it with my right palm.  Rotate the pan moving the loose flour until there is some flour stuck to all surfaces.  If any loose flour remains in the pan, pour it into the next and continue with the same procedure in the next pan.  When the final pan is coated, dump any remaining flour into the sink with the garbage disposal.
I'm not going to share this recipe because it is not original.  It is the basic yellow cake out of this late '70s Better Homes cook book.  If you want this recipe, e-mail me.

But, before you start cooking are your sink's clean.  If not, take the time to empty and clean your sinks.  Put away any clean dishes.  Get anything dirty shoved into the dishwasher.  On one side, start a sink of hot soapy water to receive any dirty dishes as they get created.  
Dry ingredients in one bowl, cream the butter in another.  The slowly start adding the wet ingredients to the dry while mixing.  I've never had a standing mixer.  My old Black and Decker hand mixer has always done what I need.  But if you have one of those nice Kitchenaide standing mixers, here is the time to drag it out. 

Stop from time to time and use a spatula to scrap the sides of the bowl.  It is just me, or does the combination of butter, vanilla and sugar have an intoxiating affect?  Maybe it just reminds me of good things. Take the time to taste.  I'm not embarrased to stand at the sink licking the bowl and you shouldn't either.  Pour the dough evenly into the two prepared pans and place in a preheated oven to bake. 

You test a cake for done with a toothpick stuck in the center.  It should come out clean.  Also the edges start to pull away from the pan.  Let them cool on a cooling rack so air can get all around them.  This will make two cakes. 

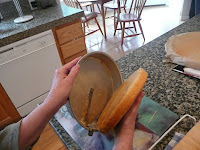
My pans are the old fashioned kind with the little thing that you run arround to loosen the bottom, but I prepared them well.  They had pulled away and popped right out.  Had to have husband help take the two handed photo.
I lined the bottom of my cake carrier with parchment, cut the cake in half and set the bottoms together cut sides down.  I cut out a little notch.  The cut out portion will be the tail.  The head is the piece on the cake to the far right on the photo will be the head.  Well, there is going to be some icing before we are done.  The picture below shows the tail in place.  There will be two rabbit cakes.


I made the butter icing recipe from the same cookbook and iced the cake.  I patted shredded coconut all over it.  


Black licorice cut up and stuck on for whiskers.  Belly Jellies for eyeballs.  The ears of index cards cut and colored, then stuck on. 

I wanted the tail pink, so I colored some of the coconut pink.  The grass is coconut colored green.  Food coloring of course.  There are jelly beans in the grass and peeps all around.  This is one.  Another to make and store until tomorrow.  Husband seems amused and entertained.  He knows his wife and is staying out of the way. 
Remember to play.


Tuesday, February 23, 2010

Bleach your Boards :)

Don't cook because you need to eat.  Don't cook because someone said you should.  Don't cook because you have to.

Cook to be happy.  Cook to be a bigger person.  Cook to create.  Cook to provide support for those around you.  Cook to create a life time of happy family memories.

Cooking for someone is one of the most intimate things you can do for them and also one of the most mood altering things.

For me, creating order is pleasurable.  Being organized in the kitchen is sort of a meditative thing.  Be clean.  Feel good. 

Bleach your boards    
It's a good habit to soak your cutting boards in bleach water once every week or two.  I haul them up to my laundry room because I have a sink large enough to accommodate the lot.  Pour a sink of warm water.  Add a cup of bleach.  Add your cutting boards and soak for an hour.  Drain and rinse well.  Dry them and return them to use.  Keeps the white ones white and the wood ones light and bright. 

Remember to stay clean. 

Monday, February 22, 2010

Potato and Ham Soup

I've discovered something very interesting.  I can use a 10 pound sack of potatoes.  I didn't know that.  I've always bought my produce a week at a time. 

But a while back, I bought a 10 pound sack of potatoes at the produce market and have been happily making potatoes ever since. 
http://dinnerattheosbornes.blogspot.com/2010/02/twice-baked-potatoes.html

They've been living in my garage frig next to the beer.  Wonder what else I can do.
Anyway, I'm on a real soup kick, seeking comfort and pleasure and giving it when I can.  We were sick with the flu a while back.  For a couple days we ate canned soup.  My husband said, "Your soup is always better.  I wish we could have that, but of course you are sick."  And he looks over at me wistfully.  

My mother put soup in quart canning jars and froze them.  I remember being very happy to come home from school and find a frozen canning jar in the sink filled with chili or split pea soup or chicken and noodles or potato soup and knowing that and corn bread with be on the dinner table.  Those were happy nights.  Dad was happy.  We were happy.  Mom wasn't stressed out.  Dad would come along and give her a pat on the bottom when he thought we didn't see.  

As I mentioned I'm on a soup kick.  I've got two packages of ham from a previous ham dinner in my freezer and fresh chives from my greenhouse, so perfect!

Potato and Ham Soup
3 T. butter
2 stalks celery, chopped
2 carrots, finely diced
1 T. flour
2 cups milk
1 t. chicken bouilon granules. 
1 14.5 oz can chicken broth
1 c. 1/2 & 1/2
4 medium russets, baked, skins removed and mashed
2 cups diced ham, 
1 t. salt. 
Fresh chives, chopped

Bake the potatoes until they stick easily with a fork, as you would for a baked potato. Melt butter in a large soup pot and add vegetables, cooking until slightly cooked,  just a few minutes.  Add the flour and stir to make a paste.  Add the milk, bouilon, broth, 1/2 & 1/2.  Stir well. Keep warm but don't boil.  Remove the skins from the potatoes and mash them with a potato masher.  Add them to the soup.  Add the ham and salt.  Now carefully bring the soup to a slow simmer.  Stir regularly to make sure it doesn't stick on the bottom.  Continue cooking on low and stirring until the vegetables are cooked to a desired softness.  5 - 10 minutes.

And now a little bit about baking potatoes.  Baking in the oven produces a very different baked potato than the microwave.  I much prefer oven baked, but it takes more time.  I have oven cooked them the night before, then microwaved the cooked potatoes to heat them.  That works fine. 

If you plan to eat them as bake potatoes, rubbing the skins in shortening then rolling them in good sea salt is gives an awesome texture and feel.  For this, though, naked potato is fine.  Bake at 400 degress until they stick easily.  About an hour.  The skin starts to separate from the meat.  The meat takes on a browned appearance just inside the skin. 

Peel away that papery dry skin to reveal the purpose of all this and go for it.  Mash away.

Remember to smile.

Friday, February 12, 2010

Cooking Techniques

Okay. Let's talk abou the cooking techniques that go into making Twice Baked Potatoes. 

Cleaning vegetables
First, the potatoes.  My mom always said that potataoes baked in the oven were just better than those from the microwave.  And, okay, Mom was just right about that.  The flavor is the same.  The texture is different.  To bake a potato in the oven.  Preheat to 425 degrees.  Scrub the holy heck out of them under running water.  I use what I call the mushroom brush on the left.  No because of the vegetable I'm cleaning but because of the shape of the thing.  I alternate with what I call "green scratchy pads"  I don't know the marketed name, but they are made by Scotch.  In the past, I've purchased vegetables that came in a plastic net bag.  Saving that and using it for scrubing works great, but I'm not buying that now.  This isn't rocket science.  Just decide what you are going to do and do it.  No pure or perfect answer.  Just thinking it out and being organized.  Live true to your values and do it. Don't let anyone stop you.

Bake cleaned potatoes in a 425 oven for 40 to 60 minutes.  To test for done, pinch between thumb and third finger to get plenty of give.  Or stick with a sharp knife until it easily goes in. 

To microwave, before cooking stick uncooked potatoes with a sharp knife to release pressure while cooking.  Skipping this step can create a potato explosion in your microwave.  Cook until done by the tests described above.  About 8 to 10 minutes for 4 potatoes.

Minced Garlic
Now Garlic.  I have very strong opinions about the stuff.  A love-hate relationship.  I love the stuff used a certain way.  It is great flavor.  I grow it in my ground, so I know what I am feeding people.  One of my good days in late June/ Early July is the day I get to dig garlic. If you're interested, here is more about that.


I like to mince garlic using the tool to the right.  Do what you want.  I watch food shows where they mince it with a knife.  I haven't have good success with that.  This tool gets the job done quickly and with minimum trouble or mess. Do what you want. 

Chopping
When working with thing that need chopping, it is best to do that all before starting to cook.  It's more organized and lets you enjoy cooking.  


So keep a couple cutting boards for this purpose.  Wash in soapy water with your after-cooking dishes.  Once a week or twice a month, I soak them in bleach water in the big sink in my laundry room.  


There is an order to the world.  Practice order.                                                                     Remember to enjoy the Zen of Chopping.

Wednesday, February 3, 2010

Mise en Place?

Recently I was listening to one of those cooking shows.  You know the ones.  A secret guilty pleasure.  Husband calls it a "Chick Thing."  Whatever.


They were talk about organizing your mise en place.  Okay, so I don't know what that is and I started listening closely.  It means getting out your ingredients and all the stuff you need before cooking.  Really?


Makes me think back to my mother's early cooking lessons.  As I've mentioned, my mother and grandmother were remarkable people, but not educated and not worldly.  And yet, I remember baking with her.  She would get out the flour, sugar, baking soda, butter, etc. and the measuring cups and spoons.  As she added each ingredient, she would put it away.  She would say that it is easier to remember if you've already added something or forgotten something if you are in the habit of putting it away once you use it. 


Another important lesson was to clean as you go.  She kept a sink of hot dish water.  As she finished with something, it went into the sink.  She was a careful wiper.  The counters were always clean because she came behind herself with a wash cloth and wiped up.  Later in life, her counters got cluttered and she was less able to maintain her earlier practices, but I find that I follow her habits.


Who knew Mom was teaching me Mise en Place?  Cooking isn't rocket science.  No wonder some otherwise competitent and highly functional people are intimidated or lack confidence in the kitchen.  Let's call it what it is.  Stay organized and clean as you go.